
Market Thesis:
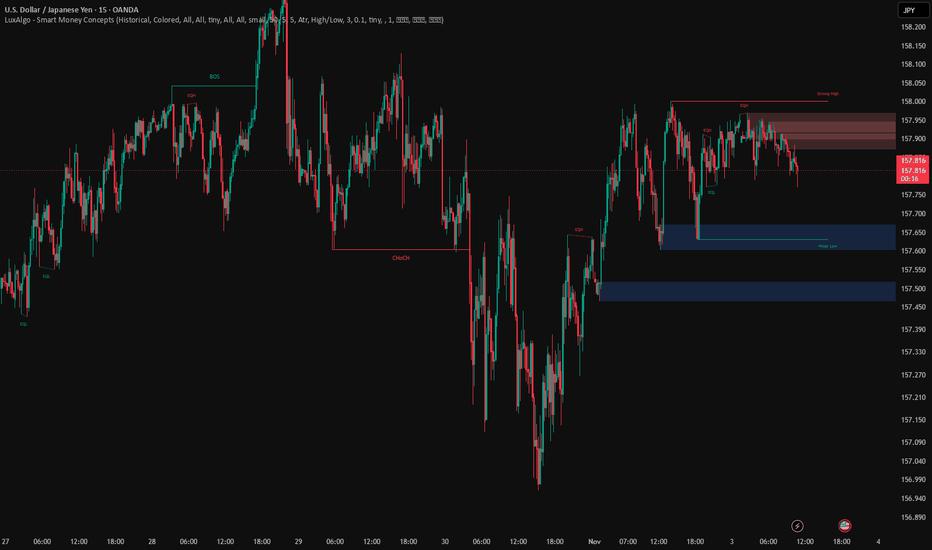
USD/JPY is showing renewed selling pressure on the 15-minute timeframe, trading near 157.798 after failing to sustain momentum above the recent equal highs.
Price remains capped beneath a well-defined premium supply zone at 157.870–157.970. With a previous bearish CHoCH visible and downside liquidity still exposed, sellers retain a tactical advantage unless buyers reclaim the upper resistance structure.
🔎 Visible Confluences (15M)
Bearish CHoCH: A historical bearish change of character developed around 157.600, highlighting a previous shift in market structure.
Bullish BOS: An earlier bullish break of structure appeared near 158.040, confirming that the broader visible structure has experienced shifts in both directions.
Premium Supply Zone: 157.870–157.970, where recent bullish attempts have stalled and selling pressure has emerged.
Equal Highs (EQH): Liquidity is concentrated around 157.930–157.950, with additional resistance at the 158.000 Strong High.
Local Equal Lows (EQL): Approximately 157.750, forming the nearest downside liquidity reference.
First Demand Zone: 157.600–157.670, overlapping the LuxAlgo Weak Low near 157.610.
Deeper Demand Zone: 157.470–157.520, representing the next highlighted downside reaction area.
🎯 Trade Scenarios
🔴 Setup 1: Sell — Premium Supply Rejection (Preferred)
Entry Zone: 157.890–157.950
Confirmation: Wait for price to revisit the highlighted supply zone, reject the recent EQH area, and print a bearish CHoCH or strong bearish displacement candle on the 1M–5M timeframe.
Stop Loss: 158.020
TP1: 157.750
TP2: 157.620
TP3: 157.490
Logic: A failed attempt to reclaim premium pricing could send price toward the local equal lows, followed by the marked demand zones.
🔴 Setup 2: Sell — Liquidity Breakdown & Retest
Entry Zone: 157.740–157.770
Confirmation: A decisive 15M close below 157.750, followed by a failed retest and bearish lower-timeframe momentum.
Stop Loss: 157.850
TP1: 157.620
TP2: 157.500
TP3: 157.390
Logic: Losing the nearby EQL structure could accelerate bearish delivery toward the Weak Low and the lower blue demand zone. The third target is a projected extension, not a marked chart level.
🟢 Setup 3: Buy — Demand Reaction
Entry Zone: 157.610–157.660
Confirmation: Price must react within the first blue demand zone and establish a bullish 1M–5M CHoCH with convincing bullish displacement. A liquidity sweep followed by a reclaim would strengthen the setup.
Stop Loss: 157.570
TP1: 157.750
TP2: 157.900
TP3: 157.990
Logic: A defended Weak Low could support a corrective recovery toward the premium supply region. This is a countertrend opportunity relative to the immediate bearish pressure and requires stronger confirmation.
⚡ Refinement Tip: Let Structure Confirm Intent
Treat the 15M chart as the reference timeframe and use the 1M–5M charts for execution.
For higher-quality entries, prioritize liquidity sweeps, confirmed LTF CHoCH signals, and displacement candles inside the highlighted zones. Avoid anticipating reversals without structural confirmation.
Key Decision Levels:
Above 158.000: Bearish supply rejection thesis weakens.
Below 157.750: Downside liquidity becomes the immediate focus.
Below 157.600: The deeper 157.470–157.520 demand zone becomes more relevant.
Current Bias: Bearish below 157.970–158.000, with conditional bullish opportunities at demand.
The objective is not to predict every move. It is to execute only when liquidity, structure, and confirmation align.
⚠️ Disclaimer
Trading financial markets involves substantial risk, and no strategy guarantees profitable outcomes. This analysis is based exclusively on the visible USD/JPY 15-minute chart and its LuxAlgo Smart Money Concepts signals. Highlighted zones are approximate chart readings, while entries, stops, and targets are proposed scenario levels—not confirmed market outcomes. This content is strictly educational and analytical, not personalized financial advice. Always apply disciplined position sizing, independent validation, and appropriate risk management.
면책 조항: 본 게시글에 표현된 견해는 전적으로 작성자의 견해이며 Followme의 공식 입장을 대변하지 않습니다. Followme는 제공된 정보의 정확성, 완전성 또는 신뢰성에 대해 책임을 지지 않으며, 서면으로 명시적으로 언급되지 않는 한 해당 내용을 기반으로 취해진 어떠한 조치에 대해서도 책임을 지지 않습니다.