
Market Thesis:
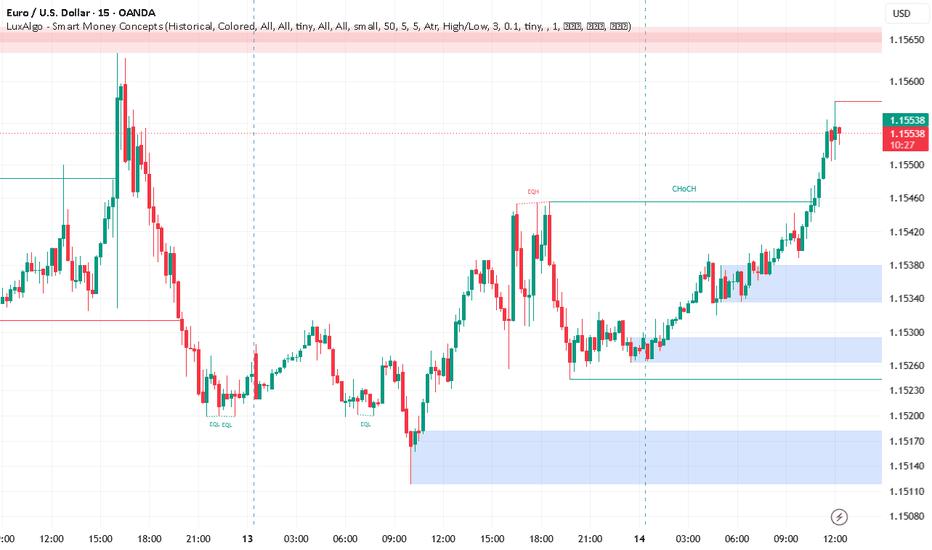
EUR/USD has shifted into bullish short-term order flow after rebounding from the lower highlighted demand area and printing a clear 15-minute bullish CHoCH near 1.15456. Momentum has since expanded aggressively higher, but price is now trading around 1.15529 inside the visible bearish zone at approximately 1.15494–1.15558.
The structure favors buyers, but this is not an ideal location to chase longs—price is entering a clear reaction area where confirmation becomes critical.
Visible Confluences (15-Minute):
Bullish CHoCH: ~1.15456, confirming the latest structural shift higher.
Earlier bullish BOS: ~1.15484, visible on the left side of the chart.
Current price: ~1.15529, already trading inside the highlighted bearish reaction zone.
Immediate bearish zone: 1.15494–1.15558.
Next overhead bearish zone: 1.15635–1.15658.
First highlighted blue demand zone: 1.15336–1.15380.
Secondary blue demand zone: 1.15264–1.15294.
Major lower blue demand zone: 1.15118–1.15182.
Key structural support beneath current price: ~1.15244.
The rally has pushed through the prior liquidity/structure around the 1.15450–1.15460 area, showing strong bullish displacement.
Trade Scenarios:
Setup 1 — SELL: Reaction From Current Bearish Zone
Direction: Sell
Entry Zone: 1.15520–1.15555
Trigger: Clear rejection from the zone followed by a 1M/5M bearish CHoCH or strong bearish momentum close back below 1.15520.
Stop Loss: 1.15568
TP1: 1.15456
TP2: 1.15380
TP3: 1.15294
This is a confirmation-based countertrend setup. No bearish structural shift = no short.
Setup 2 — BUY: Bullish Pullback Continuation
Direction: Buy
Entry Zone: 1.15336–1.15380
Trigger: Price must retrace into the highlighted blue zone and produce a 1M/5M bullish CHoCH, rejection candle, or strong bullish momentum displacement.
Stop Loss: 1.15318
TP1: 1.15456
TP2: 1.15494
TP3: 1.15558
This remains the cleaner continuation scenario while the 15M bullish structure remains intact.
Setup 3 — BUY: Confirmed Breakout Continuation
Direction: Buy
Entry Zone: 1.15558–1.15568
Trigger: A decisive 15M close above 1.15558, followed by an LTF retest that holds the breakout level as support.
Stop Loss: 1.15522
TP1: 1.15610
TP2: 1.15635
TP3: 1.15658
A sustained break above the current bearish zone would expose the next visible overhead reaction area.
Refinement Tip:
Treat the 15-minute chart as the higher execution timeframe and refine entries on the 1M/5M charts. For the best Risk/Reward, monitor these zones for LTF CHoCH signals, momentum candles, rejection, and structural confirmation before execution. Avoid entering solely because price touches a zone.
⚠️ Disclaimer:
Trading financial markets involves significant risk and there are no guarantees in any setup. This analysis is based strictly on the visible 15-minute market structure, LuxAlgo signals, highlighted zones, and probabilistic price behavior shown on the chart. It is provided solely for educational and analytical purposes and does not constitute financial advice. Always apply independent judgment, defined invalidation levels, and disciplined risk management.
면책 조항: 본 게시글에 표현된 견해는 전적으로 작성자의 견해이며 Followme의 공식 입장을 대변하지 않습니다. Followme는 제공된 정보의 정확성, 완전성 또는 신뢰성에 대해 책임을 지지 않으며, 서면으로 명시적으로 언급되지 않는 한 해당 내용을 기반으로 취해진 어떠한 조치에 대해서도 책임을 지지 않습니다.